 Photo by Deck City
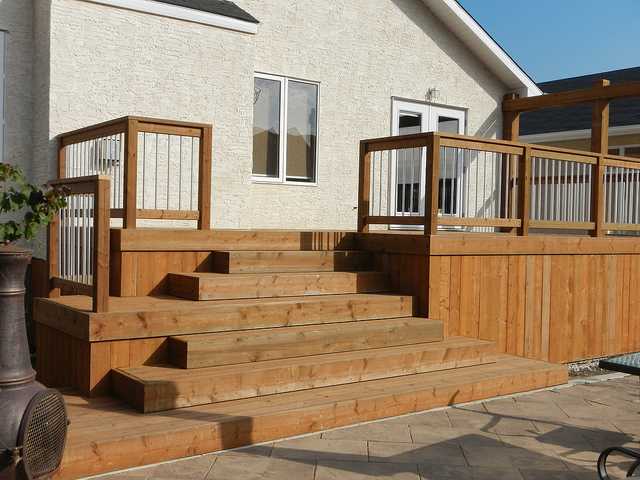
Stairs typically accompany a raised deck. Once you have done finished the deck, you proceed with the stairs. Start with understanding the different components that are to come together. The planks you use to step are called treads.
The risers support the treads on each other. The support at the side is called the Stringer. The base level of the steps is called toe-kick. You can also add balustrade and rail on the sides for hand rest support.
Raising the level
You may have a multilevel deck. Then you have to use landings to change the direction of the stairway leading to a higher level. Trying it in the DIY route is a very good option and it does not cost much either! You do not have to buy any stairway to the heavens here! The cost will vary, but obviously you have to spend less money and more time than getting it done by someone else. Check out following sections on how to set up the flight of stairways to your deck.
Essential aspects
Setting up a perfect blueprint layout is essential in any carpentry project one undertakes. Measure the distance from the ground to the edge of the deck. You have the perpendicular distance ready. Now, decide the distance of the toe kick. Usually, a flight of three to four stairs is sufficient to access a raised deck. Once you have this horizontal distance, calculate the angular Stringer length that you must make. It is an elaborate right angled triangle shape, can you not see?
While you make these calculations, account for the vital requirements as well. Make sure that each riser must be of the same length. The combined breadth of all risers should add up to only slightly less than the perpendicular height of the stairs from the ground. The risers should not be too wide or too narrow. Keep an average 7 to 8 inches for each riser plank.
The steps have to sufficiently wide as well. Your priority should be to allow the space of one full foot on the stair. In making this calculation, make sure the total width of the treads add up to a little less than the horizontal length of the toe rest from the ground at the deck level. Make them at least 11 to 12 inches wide. Finally, you must make sure that the steps have a well balanced slope that neither allows water to accumulate, and nor it poses an unbalanced tripping hazard.
Set them up
Cut the planks into shape once you have made the measurements according to the aspects mentioned above. Professionals suggest to keep the bottom riser about 1 ½ inches lower than other risers, and keep the top tread slightly shorter than the other treads. This approach has been found to provide maximum stability and balance. Start with making a detailed plan on paper. You have to calculate the number of steps you want to make and all that. Then, proceed with the stringer. Cut the inverted V shapes on the stringer to hold the stairs. Add up the treads and risers one by one securely with nails.