 Photo by kattyvoss
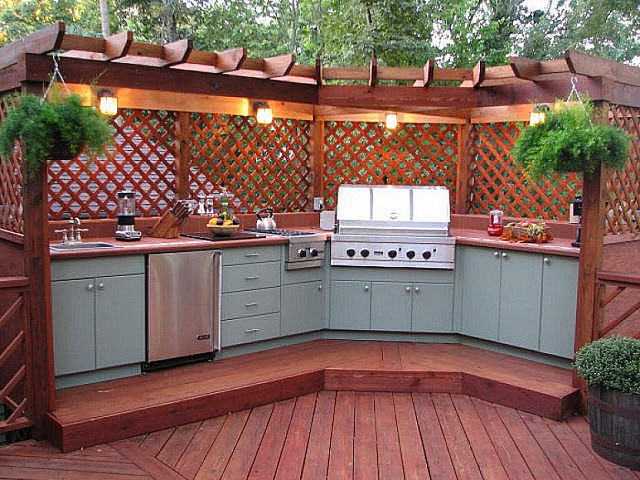
A merry gathering of folks in backyard can be merrier if you have an outdoor kitchen ready. Not only for the quintessential BBQs, but also the kitchen can be used to prepare anything you wish in the open, serving it hot to the table where all are gathered for the supper.
The grill is totally the most important part of the kitchen, so you have to kind of build the structure around it. Essentially, you have to attach the grill with a plywood base, and flank it with the cabinets. You may also want to set up gas stoves for a fully functional outdoor unit.
The particulars
You will also have to make the countertops and a working sink. Find a convenient spot to base the kitchen. Since it is a permanent structure, you may not want to put up entirely on the outdoors, making it open to rain and snow. A covered patio at your backyard is the best base to set the unit. Alternately, you can first start with setting up a deck at your backyard where you would put up the kitchen. Deck DIY instructions are also available, but here you focus on the kitchen portion.
Setting the framework
After accounting for the space you need for the grill, stoves, and the sink, build the framework to support these. Build the structure with posts. Separate them with stretchers. Use the 2×4 planks to fortify the structure. Screw the 2x4s to the top and the bottom of the posts. Also, run the 2x4s between the posts both at the top and bottom. The front and back of the posts should be strengthened likewise as well. At the places where you are going to fix the cabinets, put a 2×4 plank in the middle of the bottom framing.
Create the cabinets
Once you have the boxes, screw them together side by side. Cut plywood panels to size and create the cabinets. Get the structure together with 1¼ inch deck screws and by running a layer of carpenter’s glue. Finally, set a flange about 1 inch wide around the front portion of the finished cabinets. Set them aside to be assembled later in the final structure when you are done with these.
Attaching the lath
Start by covering the plywood with builder’s felt. Staple the felt with a staple gun. This will provide protection from water damage over the wood. Next, you have to attach a sheet of wire lath on the felt. The wires should be facing up when you attach. Run your fingers on the lath surface. The up side would feel like a cheese grater. Remember to take safety precautions like wearing gloves when you are handing the sharp lath.
Use the hammer to nail it to the cabinet body. Trim the top of the lath with tin snips so that it is flush with the frame. Next, you prepare mortar paste to set it on the lath surface. Apply it from up to down. If you find the lath moving at any place, set up a nail there to fix it into place. After the mortar paste, the mesh should not be visible. Now, you have the framework ready. Set the cabinet boxes, the grill, and the stoves in place. Your outdoor kitchen should be ready!