Photo by RaisingCasey
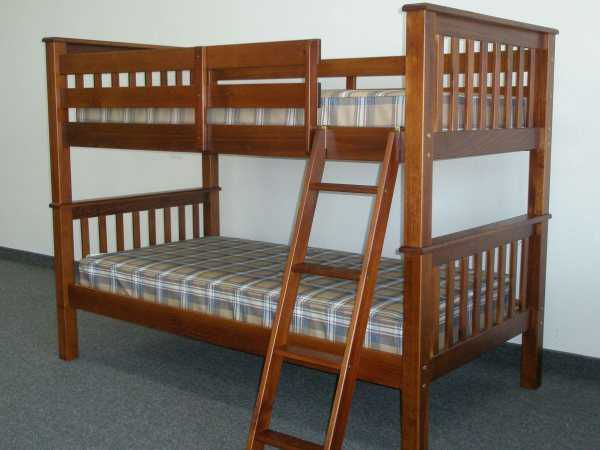
Bunk beds are common fixtures for the kids’ room. These fantastic furniture pieces are space-saving and they also look very trendy!
These beds can be set up right at your home by a DIY project. In fact, it is one of the easiest and commonest DIY projects. Many parents prefer to make the bunk beds for their children instead of buying them as it shows how much you care for your kids.
In fact, the project can be a good opportunity to have your kids learn the basics of woodworking and how to handle tools safely. Such life lessons stay forever and your children may be making bunk beds for their children when they are parents! Here you can find a brief guideline on constructing simple bunk beds.
Strength of the pillars
Safety should be a major concern here. You mainly have to make sure that the top bunk is strong enough to withstand the weight of a growing child over the years without crashing down. The supporting pillars should be strong. Use the best quality lumber because you should not be compromising on the safety of your child. You will still be making savings because the cost of buying a readymade bed is more than buying the lumber planks and beams.
The framework support should be maximally strong, the bed should not be squeaking (strong fixtures), and its length must be sufficient for a growing teen to sleep comfortably. Work on a standard blueprint. Keep the bed length to about five feet, which is sufficient for a teenager to sleep comfortably. In addition, you may want to add railings to the top bunk to make sure your child does not fall down in sleep.
However, setting the railings is a finishing touch. First, you need to set up the beds. Apart from sturdy pillars, you can also add further reinforcements of extra parallel planks between the side pillars for the ‘blocking’ balance. Many parents also prefer to attach the bed to the walls by drilling for a maximum guarantee of strength. Look up the different options and make sure to have a strong bunk bed for your kids.
The ladder
The ladder can be set to the bed in such a manner that it serves as an extra support system. Place it angularly (instead of straight) and attack its base to the lower bed. Set the ladder base in such a manner that it has support from the wall. This will ensure that the bed has extra support from the wall keeping it in place. Of course, this is but a suggestion. Generally, the ladder is not used for extra support and only for climbing to the top bed.
Make it a perfect and professional DIY project by adding bookshelves and drawers. Divans for keeping the pillows, bedsheets, and mattresses can be incorporated as well. Look up professional instructions on setting all these up. The basic plan is typical. First, you build the side frame with beams and then you place the joists. When the joists have been secured firmly, you add a laminate or plywood sheet to the top and nail them securely. Once the lower bed is ready, proceed with the upper one. After it is done, fix it above.


